In the year 1858, John Landis Mason invented and patented the Mason Jars that are now well-known. The Ball Corporation, a company that early on focused successfully on manufacturing glass containers, is responsible for the term Ball Mason Jars being commonly used today. The Ball Mason Jars feature an external thread around the glass opening, to which a metal ring can be screwed. This metal ring presses a separate, disc-shaped steel lid against the edge of the glass. An integrated rubber ring on the underside of the lid ensures a hermetic seal. As nothing can enter or exit, Mason Jars are perfect for preserving food.
However, Mason Jars can be used for more than just preserving. We'll show you 16 impressive do-it-yourself decoration ideas for your home – whether it's for the kitchen, bathroom, living room, or office.
Mason Jars in the Bathroom – Useful and Stylish
Especially in the bathroom, Ball Mason Jars prove to be particularly useful. Furthermore, they are guaranteed to become a real eyecatcher – because let's be honest, who can claim to have a Mason Jar soap dispenser? We'll show you how you can spice up your bathroom using Mason Jars. Your guests will be amazed!
#1 Exotic Mason Jar Soap Dispenser
If you already have a Ball Mason Jar in the size "Regular Mouth", perfect! All you need is a soap dispenser pump (available in our shop). Simply unscrew the metal ring from the glass and fill the jar with liquid soap (dish soap works too).
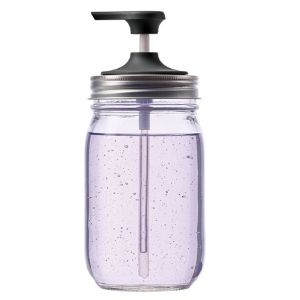
Now place the soap dispenser top on the Mason Jar's opening and screw the metal ring onto the glass's thread. This secures the soap dispenser top in place. Your Ball Mason Jar soap dispenser is ready. Definitely an eye-catching piece!
#2 Stylish Mason Jar Tissue Holder
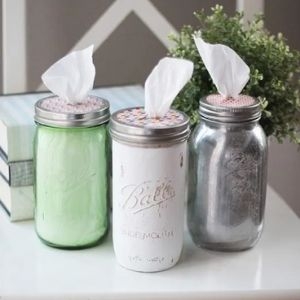
The classic tissue box in the bathroom, as many of us have, is in most cases not exactly pleasing to the eyes. Yet, with just a few steps and the help of Mason Ball Jars, you can change this in no time. To create your very custom tissue holder, you only need a Ball Mason Jar, scissors, a knife, thin cardboard, and – of course – tissues.
 Source: landeluu.com
Trace the outline of the metal lid onto the cardboard with a pen and cut it out. In the middle of the cardboard lid, cut a large X – this will be the opening for the tissues. Fill the tissues into the Ball Mason Jar and secure the lid using the metal ring. If you'd like, you can also paint the Mason Jars with colors. You can find detailed instructions for the Ball Mason Jar tissue holder here.
#3 Creative Toothbrush Holder
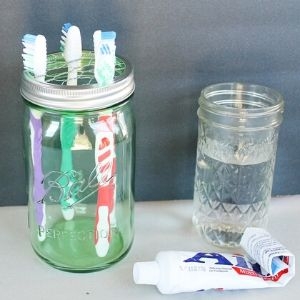
If you no longer want to keep your toothbrush in a toothbrush cup, you can easily build your own toothbrush holder with the Ball Mason Jars. For this, you only need a Mason Jar glass (we recommend "Wide Mouth", with a wide opening), wire mesh (or rabbit wire), and wire cutters – multipurpose scissors can also work as an alternative.
 Source: thecountrychiccottage.net
Cut the wire with scissors or wire cutters in the size of the metal lid. You should use the lid as a template to ensure that the cut wire will fit later. Now you can place the wire mesh on the opening of the Ball Mason Jar and secure it using the metal ring and the screw thread. You can now insert the toothbrush(es) into the Mason Jar glass – and your DIY toothbrush holder is ready! You can find detailed instructions for the Mason Jar toothbrush holder here.
#4 Maximizing Bathroom Space with Mason Jars
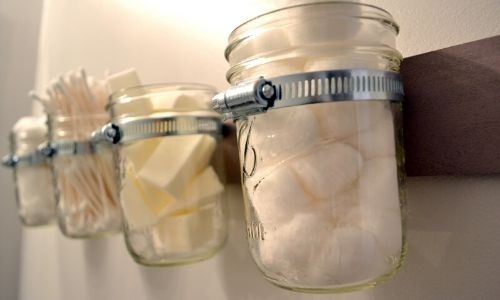
In the bathroom, there are usually a lot of cosmetic items like cotton swabs, cosmetic sponges, or cotton pads. These usually lie in the cabinet or on some shelf, taking up unnecessary space. With a piece of wood, a few Mason Jar glasses, pipe clamps, and picture hangers, you can create your own DIY wall holder.
 Source: lizmarieblog.com
Take the picture hangers and use them to attach the wooden board to the wall. Then, attach the pipe clamps to the wooden board using a screw. Instead of a pipe, insert the Ball Mason Jars through the clamp – and your own wall holder is ready! You can find detailed instructions (including images) for the Ball Mason Jar wall holder here.
Mason Jars in the Kitchen – Handy Helpers
We've also gathered some unique ideas for the kitchen. This way, you can gain a bit more space in your kitchen in a creative way – and the best part? It's not only useful but also looks fantastic!
#5 Magnetic Ball Mason Jar Spice Holder
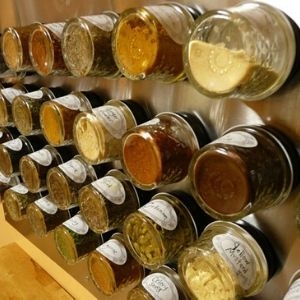
A magnetic spice rack is undoubtedly an eye-catcher and also really practical. All you need is a magnetic surface on the wall (you can, for instance, attach a thin sheet of stainless steel to the wall), Mason Jar glasses, glue, and some neodymium magnets.
 Source: justcallmemissdiy.wordpress.com
Once you've attached the stainless steel sheet to the wall, you can glue the neodymium magnets onto the top of the lid of the Ball Mason Jar glasses. With the magnets and the stainless steel sheet, you can easily attach the jars to the wall and remove them when needed. Now, all you have to do is fill the Ball Mason Jars with your favorite spices! For more information, you can check out the details about the magnetic Ball Mason Jar spice holder here.
#6 Salt and Pepper Shakers from Ball Mason Jars
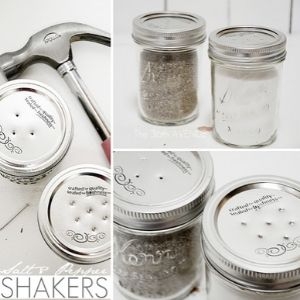
If you'd like to start with a small DIY project, we recommend beginning with making salt and pepper shakers from Mason Jars. For this, you'll need two Mason Jar glasses (one for salt and one for pepper), a thin nail, and a hammer. Using the hammer and nail, gently tap small holes into the metal lid of the Mason Jar. Make sure the holes aren't too large! Next, fill the Mason Jars with salt and pepper to create your own mini DIY project.
 Source: the36thavenue.com
By the way, these are perfect for picnics or similar occasions. You only need to replace the metal lid with one without holes for transport, ensuring nothing spills. You can find detailed instructions for making Mason Jar salt and pepper shakers here.
#7 Ball Mason Jars as Drinking Containers
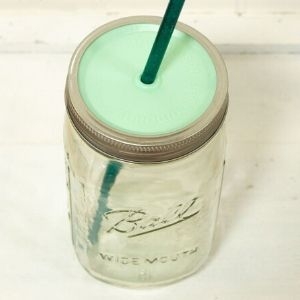
Admittedly, this point is not a true DIY project, but we've included it on the list because it beautifully reflects the versatility of Ball Mason Jars. With a custom-made lid, you can turn the preserving jar into an adorable drinking container.
 Source: american-heritage.de
In our shop, you can find lids in different colors that are suitable for both sizes (Regular Mouth & Wide Mouth).
Enhance Your Living Room with Mason Jars
We spend the most active time in the living room. Reason enough that we should feel comfortable there. That's why we'd like to present you with some ideas on how to decorate your living room using Mason Jars.
#8 Personalized Vases – According to Your Preferences
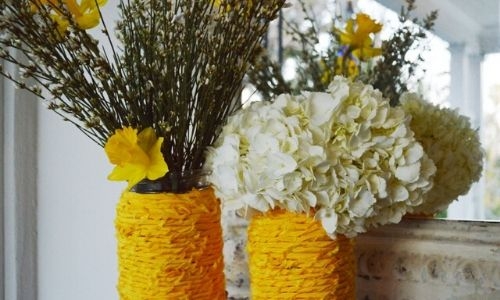
Especially for smaller cut flowers, Ball Mason Jars are excellent vases. You can design and decorate them according to your preferences. Paint the glasses in your favorite color or embellish them with colorful ribbons – your imagination knows no limits.
 Source: mrkate.com
#9 Ball Mason Jar Mini-Aquarium
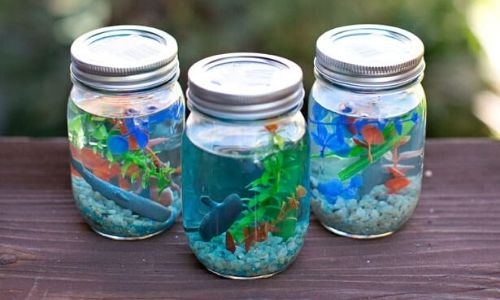
The mini-aquarium is one of our personal decoration highlights. For this, you'll need a Mason Jar glass, some blue food coloring, water, small plastic figurines or a toy fish, plastic plants, and small stones for the aquarium. In the first step, pour the stones into the Mason Jar glass and then fill it with water. Now you can place the plastic figurines and plastic plants inside the jar. Add some blue food coloring until you're satisfied with the color of the water.
 Source: hellowonderful.co
If you like, you can add a few drops of glycerin. Glycerin makes the water slightly thicker and causes the figures in the water to move more slowly. Finally, close the Ball Mason Jar with the accompanying lid and the screw thread – your own mini-aquarium is complete. You can find detailed instructions here.
#10 DIY Matchbox for Home
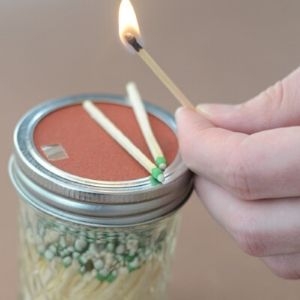
Do you find unusual things interesting? Then this matchbox might be just right for you. For the DIY matchbox, you'll need a Mason Jar glass, Cowboy matches (strike-anywhere matches), a knife, scissors, and sandpaper.
 Source: theburlapbag.com
Use scissors to cut the sandpaper to the size of the lid of the Mason Jar. Then use the knife to cut a small hole in the new sandpaper lid. This allows you to easily take the matches out of the Ball Mason Jar without having to unscrew the lid every time. Now you can fill the strike-anywhere matches into the jar and securely close it with the sandpaper lid and the metal ring using the screw thread – your extraordinary DIY matchbox is ready.
#11 Unconventional "Picture Frames" with Vintage Oil
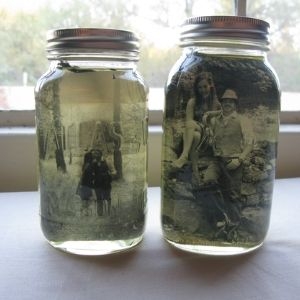
If you're into unusual pictures in the vintage style, pay attention! For the picture frame, you'll need a Mason Jar glass, a trimmed picture (ideally in black and white), vegetable oil, and optionally dried flowers.
 Source: augandeverythingafter.blogspot.com
Place the picture inside the Mason Jar glass and pour in enough vegetable oil to completely cover the picture. If you like, you can now place the dried flower on the opposite side of the picture, in the middle of the glass. Finally, secure the lid using the metal ring. The oil creates the vintage effect of the picture – it becomes slightly transparent and develops a slightly yellowish hue, giving it the appearance of an old picture from the past. You can find detailed instructions here.
#12 Stylish Candle Holders for Your Living Room (or Balcony)
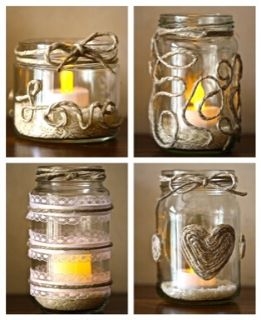
Candlelight is known to create a cozy atmosphere. It gets even homier when you place tea lights & Co. in decorated Mason Jars. We particularly like the ideas from WhatAboutThis and they are relatively easy to recreate. For this, you'll only need Mason Jar glasses, a hot glue gun, sand (or small stones), twine (or yarn), scissors, and tea lights. Alternatively, you can also use a Daylight from Kringle Candle or Country Candle – creating an authentic and pleasant scent experience at the same time.
 Source: whataboutthis.biz
Simply remove the metal ring and lid from the Mason Jars and fill them with sand or small stones. Then place the tea light or Daylight on top. Use the hot glue gun to attach the twine to the Mason Jars according to your preferences. Have fun decorating!
Pimp up your office – Mason Jars in the office
Anyone who thinks Mason Jars are only suitable for the kitchen, bathroom, and living room is mistaken. These American glasses are also incredibly useful in the office. We've summarized some ways you can use Mason Jars in your office.
#13 Mason Jars as Piggy Banks
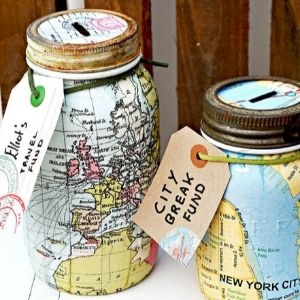
When it comes to a DIY piggy bank, you can let your imagination run wild. In the simplest version of the piggy bank, you'll only need to cut a slot centrally in the metal lid – large enough for coins. Alternatively, you can replace the metal lid with a trimmed piece of cardboard.
 Source: pillarboxblue.com
The best part is that you can get really creative with the design of your new Mason Jar piggy bank. For example, Pillar Box Blue has created a "Travel Bank" that we find absolutely fantastic. Do you have more ideas or motifs?
#14 Safely Store Sewing Supplies with Mason Jars
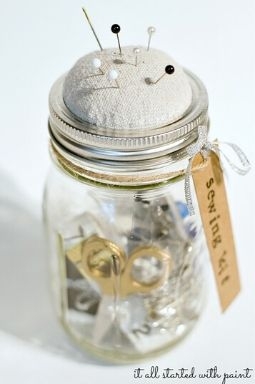
Paper clips, needles, thread, scissors, a thimble, measuring tape, and pins – all of these belong in a well-organized sewing kit. The modern version using a Mason Jar glass is not only a welcome change from the conventional sewing kit but also really practical. The integrated pincushion on the lid allows you to store pins safely and easily pull them out when needed.
 Source: itallstartedwithpaint.com
You can find the Mason Jars and the useful pincushion in our shop!
#15 Trendy Pencil Holder – Tailored to Your Taste
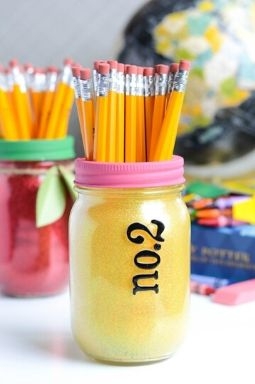
Are you looking for an extraordinary pencil holder? DIY pencil holders made from Mason Jar glasses have the solution! For this, you'll only need a Mason Jar glass from which you need to remove the metal lid. After that, it's all about your creativity. Customize the Mason Jar glass individually to your liking.
 Source: apumpkinandaprincess.com
On the website A Pumpkin and a Princess, you'll find some inspirations on how Mason Jar glasses can be turned into a real eye-catcher using glitter paint. We like it – do you?
#16 Mason Jar Pencil Sharpener
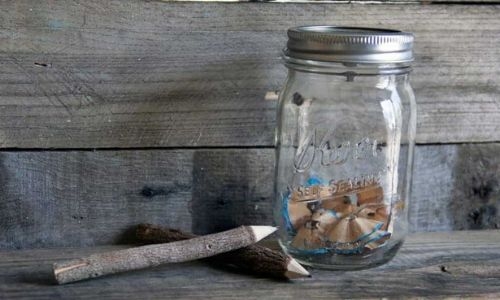
Truly practical and definitely an eye-catcher: the Mason Jar pencil sharpener. All you need for this is a Mason Jar glass, a drill, a small pencil sharpener, and strong liquid glue. Using the drill, bore a central hole (the size of the pencil sharpener's opening) in the metal lid of the Mason Jar glass. Glue the pencil sharpener to the underside of the lid and let the glue dry overnight.
 Source: diyhuntress.com
The next day, you can secure and screw the prepared lid using the metal ring. Your DIY pencil sharpener is now ready, capturing the sharpened pencil remnants directly. Quite practical, isn't it? You can find a detailed guide (including images) here.


